 This post will detail the password filter implant project we developed recently. Our password filter is used to exfiltrate Active Directory credentials through DNS. This text will discuss the technicalities of the project as well as my personal experience developing it. It is available under an open source license on GitHub.
Context
The mindset behind this project was to expand our offensive security toolkit. We needed to expand our toolset with more persistence-oriented assets. It was suggested we create a password filter that would exfiltrate usernames and passwords from the Active Directory. Because we did not find any open source password filter implant projects that met our requirements, we decided to add the idea to our exhaustive list of offensive security project ideas.
When it was time for me to choose a concept to work on from the project list, the password filter implant caught my eye. Conceptually, the project was easily understandable for me. This is the main reason I chose this project even though I had no prior pertinent experience in C programming. I figured: “Hey, we all start somewhere!” and it was my first university internship, after all. Plus, I was more than ready to take on the challenge.
Understanding LSASS.exe and Password Filters
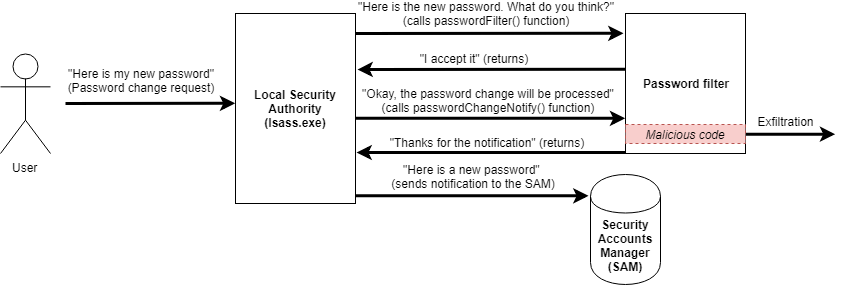
Password filters is a Windows feature that provides a custom implementation of password security policies. When a user requests a password change, the request is transmitted to the Domain Controller (DC), where the password filters are installed. Then, the Local Security Authority (LSA) service, also known as the lsass.exe process, calls each password filter present on the DC to validate the new password against the password security implementation of each filter. When each password filter validated the new password, the LSA then notifies every password filter that the password of the user is about to change. Then, the hashed password is stored in the Security Accounts Manager (SAM) database, which the Active Directory refers to when authenticating users.
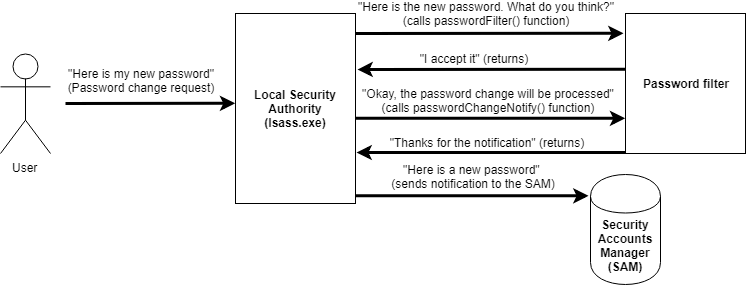
What is interesting about this feature is that the password, as well as the username, is passed to the password filter in plaintext. By implementing your own password filter, you can directly manipulate the plaintext password. Instead of writing a password filter that checks for the password’s strength, we decided we would create a password filter that exfiltrates the username and password by writing malicious code in a password filter implementation.
It sounds scary that with a simple password filter, anybody could steal AD credentials from your system. The thing is; installing a password filter on a DC requires Domain Admin privileges. A password filter that performs exfiltration is a persistence solution, not an attack vector.
Learning C and the Windows API
We chose to develop the password filter in C rather than using C++ for maximum compatibility. We thought it would be more convenient since the Windows API is in C.
This was my first real experience in C programming. Pretty tough to learn C using Windows API for someone who had always worked with higher level programming languages. Needless to say, Google was my best friend. I had entered the land of undefined functions, short documentation, and Stack Overflow questions with no answers, or vague ones. In the end, I still liked the experience and I’m planning on continuing programming in C. Shout out to Martin Lemay who greatly helped me with some advanced technicalities throughout the development!
Adding DNS exfiltration
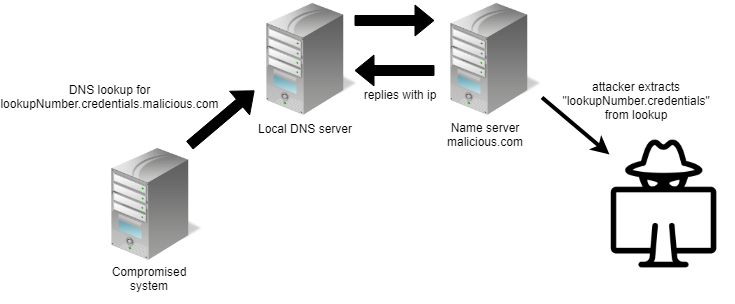
At first, we thought of using the HTTP protocol for exfiltration. The major problem with using HTTP is that outbound HTTP requests from the LSA process would be flagged as abnormal since the lsass.exe process doesn’t perform HTTP requests on its own. It is why we decided to use the DNS protocol to perform exfiltration. It is much more normal for the LSA to generate DNS traffic. By opting for DNS, data exfiltration is stealthier.
To exfiltrate data using the DNS protocol, we perform a DNS lookup. A DNS lookup for a given domain name an attacker controls (ex: malicious.com) is made by the LSA of the compromised system after a password change occurred. The request will go through the local DNS server and will end up at the malicious.com server. To avoid caching the lookup is made in the format: lookupNumber.encoded-credentials.malicious.com.
One risk of exfiltrating through the internet is someone else intercepting the data. Since we can’t afford to expose our client’s data to the internet, the data is encrypted before being sent over the wire. For now, we use a static key that resides on the compromised DC to XOR the data. Here is how the DNS exfiltration with encryption looks in Wireshark:

Writing a PowerShell Empire module
We decided to publish our project as a PowerShell Empire module to make it easier to use in pentests. Even though I had never written any PowerShell scripts before, it was not hard to learn what was required to integrate our password filter. Also, adding our PowerShell script to the Empire project was simple, the maintainers really did a great job creating script templates for easy module integration. You can find our pull request here.
To use the Powershell Module, set the DomainValue and KeyValue you want to use for DNS exfiltration. Set the agent and change the DLLName and DLLPath parameter’s value if necessary. Make sure you have administrative privileges on the agent you want to use. Then, launch the module.
The agent will restart and load the password filter DLL in the lsass.exe process. This can be verified using the ProcessExplorer utility. The password filter DLL will be in the Windows installation directory and the domain, key, and password filter will be added to the registry.
For every password change on the agent, the username and password will be XOR-ed and exfiltrated to your domain. Here we used Wireshark to verify that a DNS lookup was made to the correct domain with the data to exfiltrate.
To clean up, set the Cleanup parameter to “True” and launch the module. Be sure to use the correct DllName parameter value to assure a proper cleanup of the registry.
The agent will restart and the DLL will be unloaded from the memory.
Extensibility of the project
We already have multiple ideas for improvement. First, we would like to implement a server-side solution that would automatically decrypt the data and store the credentials in a database. It would help us efficiently organize the collected data especially if it comes from multiple Active Directory domains. Then, adding a key exchange feature would allow us to get rid of the static key on the DC. Those are just some of the ideas we have, there are more improvements that could be done.
Conclusion
The password filter implant project was developed to allow the pentest team to maintain access even if compromised accounts get their password rotated. The deployment of a persistence technique like this one ultimately helps identify the lack of proper network and system monitoring on engagements, while training blue teams about such tactics, techniques, and procedures (TTPs).
Even though writing such a password filter was a daunting challenge on many levels for me, I loved the experience. I learned so much about the C language, Windows OS low-level programming and offensive security. Many thanks to Laurent Desaulniers without whom it would not have been possible. Thanks to Martin Lemay, the Windows and C programming expert for this project, and to all my other colleagues for the help and encouragement. I hope this project will be useful for GoSecure’s future red team assessments.
This blog post has been written by Léanne Dutil who completed her first undergraduate degree internship with us. We are proud of Léanne’s work and we are glad she accepted the opportunity to share her research and tool with the world.
